

PHOTO CREDIT: NICK SOLONINKA
The Casual/Go To Outfit: I'm LOVING leather this year as you'll see in these different looks, but dressing down leather in a Varsity Jacket style is definitely my kind of thing. I love my neutrals but adding a pop of color makes the outfit!
Red Leather Jacket: OBEY Propaganda
Black Leather Front Paneled Pants: H&M
Red and Black Online Exclusive Zip-Up Sk8 Hi Slims: Vans

PHOTO CREDIT: NICK SOLONINKA
Let's Talk Makeup: Again, I gotta have my neutrals but for Fall, I really like to darken up my makeup in a Vampy way. For this particular shoot, I did do a little bit of a smokey eye, but not too dramatic because I wanted my eyes and lashes to really stand out. I'm not gonna lie, I went heavy on the foundation, concealer and contour just because I did want the "porcelain skin" look. I wanted my skin to look flawless so the rest of my makeup had a nice canvas to work with.
Here's the Products I Used To Achieve This Look: Before I put ANYTHING on my face, I made sure to exfoliate with my St. Ives Apricot Scrub while I was in the shower followed by doing the same skincare routine after I get out of the shower which is, use my Proactive Face Toner, moisturize my face with the Avon Firming Moisturizer and also layered my Proactive face lotion over the Avon moisturizer just because my skin was looking a little dry that day.
Okay, now let's really get down to the makeup game!
So, after I had a clean canvas to work with I used my Revlon Beyond Natural Smoothing Primer, which honestly I'm not quite a fan of but I needed something to fill in my pores and have something for my foundation and concealer to stick onto without caking up. (I have yet to find a primer that is life changing.)
Foundation Time: I've used the same foundation for years now which is the Mac Studio Fix Fluid Foundation that I swear by. For all over my face I used NW13 because one, I am quite pale and I've found that the Mac Studio Fix Fluid Foundation does tend to oxidize a little bit on my skin so currently NW13 is my perfect match! I swear by this foundation because it literally covers all my face demons but can also be sheared out if you desire a less full coverage foundation. Luckily for this shoot, I only needed one pump for my whole face and stippled it on with my Sephora Duo Fiber Stippling Brush from the Luxe Brush Set that I've had for a couple of years and gave me a nice full coverage, airbrushed look that evened out my skin tone since I do have some hyper pigmentation from when I was a teenager.
Contour and Highlighting Part One by Using Liquid and Cream Products: On a daily basis I don't contour quite as heavy as I did for this shoot. I wanted my face to be very chiseled out with sunken in and defined hollows of my cheeks to stay with the Vampy Edgy look. To countour, I used my Neutrogena Shine Control Liquid Makeup that's a good few shades darker than my actual skin color and the shade that I used was in Natural Beige and applied it on the hollows of my cheeks but stopped where it lined up vertical to the pupil of my eye. I also applied it along my jaw line to define it and on my temples to warm up my complexion. Tip: Don't know what the hollows of your cheeks are? Make a fishy face and where your cheeks are sucked in, those are the hollows of your cheeks. It's that straight line from your temples to your lips!
After applying the foundation that I was using to contour, I blended it all out with a dense flat top Kabuki brush by Sephora so I could control where the product was being displaced and that gave me that nice straight line under my cheek bones without getting it all over the place.
Highlighting: Highlighting isn't really my strong point in makeup, but I did really need to hide those darn eye bags so, I used my Avon Ideal Flawless Concealer in the color Fair to brighten up my tired eyes using the infamous Kim Kardashian upside down triangle technique to highlight. This concealer is great for under the eyes but needs to be set as soon as it's blended out because it does crease quickly, which I'm not a fan of. (I set it with my Rimmel Stay Matte Powder with a fluffy blending eyeshadow brush from Sephora.) I also hit the concealer in between my eyebrows and the middle of the forehead in an upside triangle yet again and blended it out. Now here comes the reason why I'm not a huge fan of this product, I applied this concealer down the bridge of my nose, blended it out and then when I got up close and personal to the mirror, I realized it caked up, accentuated my pores; making them look freaking huge, made my nose look dry and patchy and that's not cute. So, I wiped the makeup on my nose, reapplied the foundation on my nose and left it alone.
Contouring, Highlighting and Setting My Face With Powder: This all seems like it's a lot but during shoots I need my foundation and every cream product to be locked into place so it's not sweating off or sliding off from being an oily monster. So, to set my whole entire face I used my trusty old Rimmel Stay Matte Powder which is definitely a cult favorite in the beauty community because it's cheap, you get a lot of product, it's finely milled, smooth and literally takes all the shine away and makes your foundation and concealer look flawless throughout the day! After setting my whole face, I go in with my Avon Mineralized Baked Bronzer, that got discontinued where I put the darker foundation was placed to warm up the look a little more. Since my face was so incredibly matte, I needed to put some more dimension back into my face, I used my Mac Mineralized Skinfinish in Lightscapade right on top of the highest points of my cheekbones that really accentuated my cheek bone structure.
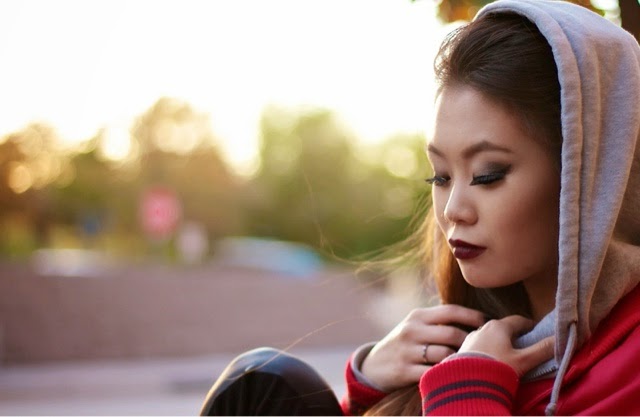
PHOTO CREDIT: NICK SOLININKA
The Eyes: I wanted my eyes to be the focal point of this look along with the lips. But, to not be so overdone since I was rocking dark and bold lips. I kept the eyes neutral but in a sultry way and making the lashes be the statement of the eyes. I used an Avon Palette that I've had for ages because I can create so many looks with just this palette. So, I applied the dark brown in my crease as the transition color before I applied anything else. I then put a matte cream color all over the lid, hit my outer V with black and sat there blending to create a smokey effect and then to put more dimension into the eyes I used a dark burgundy color to intensify the very outer edge of my eye. It's pretty easy, I must say! Alright, liner time. I used my Maybelline Eye Studio a Lasting Drama Gel Eyeliner in Blackest Black to create a dramatic cateye and lined my lower lash line to make the look darker
Mascara, my lashes best friend. Before, I touched my eyelashes, I curled them because my lashes are super straight. When I was done curling my lashes, I went in and used generous amounts of my Smokey Extravagant Mascara by Makeup Forever in Black to fatten up my lashes to prep them for falsies! But for my lower lashes I hit them with Benefit's "They're Real?!" Mascara also in Black.
The Brow Game: My brow game needed to be on point since I had a ton going on with my eyes. To fill them in I just used my Anastasia Beverly Hills Brow Duo in Brunette and set them in place with the Anastasia Clear Brow Gel.
I'm almost done, I swear! So, because I did fatten up my lashes, I wanted more volume and length so I applied the Ardell Fashion Lashes 113 in of course Black because I wanted DRAMA.
The Lips: The lips complete this look and is super on trend! I used MAC's Lip Pencil in Nightmoth and MAC's Cyber Satin Finish Lipstick! AND WE'RE DONE :)

PHOTO CREDIT: NICK SOLONINKA
Outfit: Forever 21 Meshed Sleeved/Neckline Bodycon Dress (Unavailable)
OBEY Propaganda Quilted A Symmetrical Leather Jacket with Gold Accents
Gianni Bini Kyley Sandals (4 inch heel.)

PHOTO CREDIT: NICK SOLONINKA
Red Leather Jacket: OBEY Propaganda
Black Leather Front Paneled Pants: H&M
Gianni Bini Kyley Sandals (4 inch heel.)

Outfit: Forever 21 Meshed Sleeved/Neckline Bodycon Dress (Unavailable)
OBEY Propaganda Quilted A Symmetrical Leather Jacket with Gold Accents
Gianni Bini Kyley Sandals (4 inch heel.)
Don't forget to follow me on Social Media!
Instagram: katielafleurr
Twitter: kallmekatiee
YouTube: ItsKatieLaFleur
Facebook: Katie Marie McBride
No comments:
Post a Comment